
Updated: May 24, 2026, for increased GL.iNet 4.9.x firmware compatibility & new IPv6 capability.
Summary (Why you likely want this)
I had a consult with a new customer a couple weeks ago with a familiar story. They reached out to us after using a self-configured GL.iNet router setup with a Tailscale exit node as a VPN solution for remote work. Things had been working well for months, but then they suddenly got “the call” from work.
While GL.iNet routers make the best travel platform on the current market, and we are also a big fan of Tailscale for many use-cases, the lack of an integrated on-device kill switch for Tailscale when being used on a router has always made me uneasy recommending it for customer remote work setups.
This most recent case motivated us to investigate further, and unfortunately the findings showed the issue is real and repeatable:
Now, to be clear.. this is NOT a knock on GL.iNet. This is a reminder to all of us. When a company clearly labels a feature as Beta, we should take their word for it. This is exactly the type of bug that Beta software testing is expected to catch.
Fortunately, having now isolated the “mystery issue,” we could address it – though finding the right answer was a surprising amount of work (I’ll spare you the details) – and while we were patching this, it also seemed a good time to address a few existing functionality gaps with some enhancements.
I’ll also take a moment to mention that there is another reason I don’t often recommend Tailscale for remote work setups: it often does not play well with “nesting” of corporate VPN software clients due to the MTU overhead of the TS design. I typically prefer native WireGuard/OpenVPN if available, or ZeroTier as a fallback if port forwarding is not available, but this explanation is worth a post of its own. Tailscale remains a great tool if it happens to work for your particular use case (and for many other uses).
TL;DR Instructions
This gl-tailscale-fix is a GL router plugin package that provides:
- Adds essential Secure Kill Switch when using Custom Exit Node routing (IPv4 & IPv6 protection as of v1.0.20)
- Adds the long missing Advertise as Exit Node function to allow your GL router to be used as a TS exit node (aka. VPN server) for <4.9 firmware. In 4.9+ fw, this is replaced by “Run Exit Node”.
- Subnet Routing Fix – plugin auto-enables masquerade (IPv4 & IPv6) on the tailscale0 firewall zone on pre-4.9 firmware (defense-in-depth for cross-subnet routing). On firmware 4.9+, GL added a native ‘IP Masquerading’ toggle on the Tailscale page and the plugin defers to it. On pre-4.9 routers acting as an exit-node server, the plugin also sets
wan.masq6as a defense-in-depth backstop so IPv6 traffic can egress – allows exit nodes to provide full end-to-end IPv6 data paths. - Adds ability to enable Tailscale on your router’s Guest Network (bonus feature)
- Adds ability to enable Tailscale SSH (bonus feature)
- Adds one-click Tailscale Updater (bonus feature)
Jump right to installation to get started.
Current GL + Tailscale Beta Gaps:
Gap 1 – Security: The TS “Kill Switch” Has a Blind Spot
When you route traffic through a Tailscale exit node, Tailscale’s software daemon (tailscaled) acts as a software kill switch. If the exit node becomes unreachable, traffic is blackholed instead of leaking. This covers the normal case: tunnel drops, remote server reboots, network blips; and should protect you well when running directly on single device (PC/laptop, phone, etc).
The problem is what happens when tailscaled itself stops running on a router, such as the GL’s “Custom Exit Node” beta function. The TS kill switch lives inside the daemon — if the daemon crashes, gets OOM-killed, or fails to start after a reboot, the kill switch disappears with it. The router’s client traffic silently continues routing directly out the router’s WAN interface without protection, and your real IP address is exposed.
On a memory-constrained GL travel router, a TS OOM kill is a very realistic failure – in fact there will be a part 2 post coming soon about TS performance and regular crash conditions we’ve discovered as part of this testing – but more unfortunately, these IP leaks even happen when just making simple UI changes such as switching between Custom Exit Node target IPs.
For casual use, this isn’t an issue – typically the TS daemon will eventually recover and traffic will resume flow through the tunnel. In most of our testing the leak is <10 seconds, even after intentionally hammering the daemon with SIGKILL – but for anyone relying on the tunnel with a continuously monitored device, even a couple seconds is plenty to have set off alerts.
Notes:
1) Update 5/24/2026: it seems GL has taken note and started adding kill-switch functionality to some of the more recent releases to close this gap. We’ve found it added on some pre-4.9 release and missing on other 4.9.0+ releases (no consistency). On these models it remains safe (compatible) to use the plug-in’s kill-switch for defense in depth, and to ensure both IPv4 & IPv6 security.
2) As of v1.0.20 – the plugin adds complete IPv6 killswitch protection across all supported fw versions, so it’s now safe to take advantage of IPv6 tunnels if your server and travel networks support it.
Gap 2 – Functionality: Enabling your GL Router as an Exit Node “Server”
GL’s admin panel lets you direct traffic to a remote Tailscale exit node (client side), but there’s no toggle to advertise the router as an exit node (server side). Most every current workaround requires a small manual hack using SSH to edit GL’s TS startup script by adding “--advertise-exit-node” to the “tailscale up” command. A modification that is subject to getting wiped by GL firmware updates.
Note: This function has finally been added to the native 4.9.x series of GL firmware.
The Solution: gl-tailscale-fix
gl-tailscale-fix is an open-source plugin that adds the missing Tailscale features directly into GL’s admin panel. The controls appear on the existing Tailscale page using the same toggle style, same layout, same card design – without modifying any existing GL base files. No SSH required.
gl-tailscale-fix Features Detail:
- Guest Network Access – optionally route the router’s guest network (br-guest) traffic through Tailscale. GL’s firmware only creates LAN-to-Tailscale forwarding – guest network clients were excluded entirely.
- Routing Kill Switch – policy routing rules that block all LAN and guest traffic from reaching WAN at the kernel routing layer, covering both IPv4 and IPv6 (v1.0.20+) before conntrack and firewall evaluation. Prevents even established connections from leaking when the exit node drops. Unlike Tailscale’s built-in kill switch, these rules persist through daemon crashes, OOM kills, reboots, and service restarts — even when
tailscaledisn’t running. - Advertise as Exit Node – one-click toggle to make your router available as a Tailscale exit node. No SSH, no script modifications.
- Tailscale SSH — toggle for
tailscale set --ssh, enabling SSH access from Tailscale peers. Requires an SSH ACL rule in the Tailscale admin console. - Tailscale Version Manager – see the current vs. latest version, one-click update with space-optimized binaries from Admon’s popular glinet-tailscale-updater, plus a factory restore.
- Plugin Update Notification – automatically checks GitHub for newer gl-tailscale-fix releases and shows an update badge with download link in the admin panel to grab the new package.
- Subnet Routing Fix – auto-enables masquerade on the tailscale0 firewall zone (including IPv6 as v1.0.20), fixing a common issue where cross-subnet LAN traffic between routers breaks after a Tailscale restart.
On firmware 4.9+, GL added an ‘IP Masquerading’ toggle in its native Tailscale page. The plugin defers to the manual toggle setting on 4.9+. On pre-4.9 firmware, the plugin continues to auto-enable masquerade as defense-in-depth, and as of v1.0.20 it also ensures IPv6 egress for routers acting as exit-node servers by settingwan.masq6as a backstop for consistency across model and firmware variants.
The plugin is under 50KB, installs in seconds, and never modifies any existing GL-owned files. Clean install, clean uninstall.
NOTE: This package works as an enhancement to GL’s Tailscale implementation. It will not add Tailscale to GL routers that do not already have GL’s supported Tailscale Beta features. For older/non-supported GL models, try here.
Installation
🛑 Important – If you are already using your GL router as an Exit Node:If you previously manually modified /usr/bin/gl_tailscale to add --advertise-exit-node (a workaround from popular guides such as TheWiredNomad on step 3.5), you’ll need to undo that change before installing gl-tailscale-fix to avoid conflicts.
As of v1.0.15 this manual restore process is no longer necessary. Both the installer script and the LuCI package installer method will check if your /usr/bin/gl_tailscale file was previously modified, and if so, restore the original version from GL firmware ROM to prevent conflicts.
Compatibility Note: Tested on GL firmware 4.6.x – 4.9.0. On firmware 4.9+, the plugin auto-adapts to coexist with GL’s native Tailscale enhancements (see Compatibility section below).
Install Option 1: Via the LuCI Admin Panel
- Download the
.ipkfile from our GitHub releases page to your computer (select the gl-tailscale-fix_latest_all.ipk) - Open your GL Admin Panel (e.g
http://192.168.8.1) - In GL Admin Panel (AP): SYSTEM > Advanced Settings > Go To LuCI (click to install first if needed)
- In LuCI: System > Software > Upload Package
- Select the
.ipkfile and install
Install Option 2: Via SSH
Step 1: Open a terminal on your computer:
Linux: Open your terminal app
Windows: Open PowerShell (search for it in the Start menu)
Mac: Open Terminal (search for it in Spotlight)
Step 2: Connect to your router via SSH by typing (replace 192.168.8.1 with the IP address of your router):
ssh root@192.168.8.1When prompted, enter your router’s admin password (the same one you use to log into the GL admin panel). You won’t see the password as you type – that’s normal. Press Enter.
Step 3: Once connected, paste this command and press Enter:
wget -q https://github.com/RemoteToHome-io/gl-tailscale-fix/releases/latest/download/install-gl-tailscale-fix.sh -O install-gl-tailscale-fix.sh && sh install-gl-tailscale-fix.shYou’ll see a few lines of output ending with “Done.” – that’s it, the plugin is installed.
After Installation
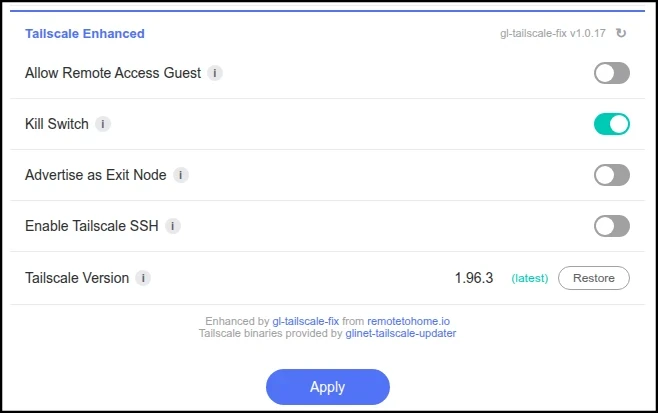
Navigate to AP > APPLICATIONS > Tailscale. The new controls appear automatically below GL’s built-in settings under a “Tailscale Enhanced” divider. No reboot needed.
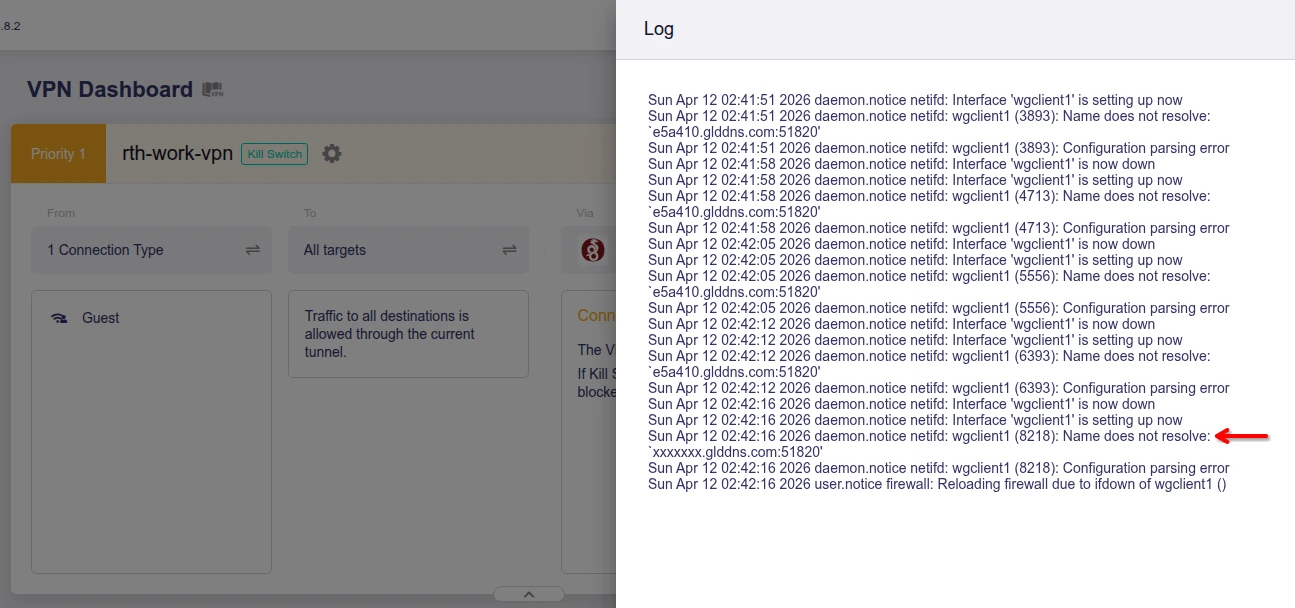
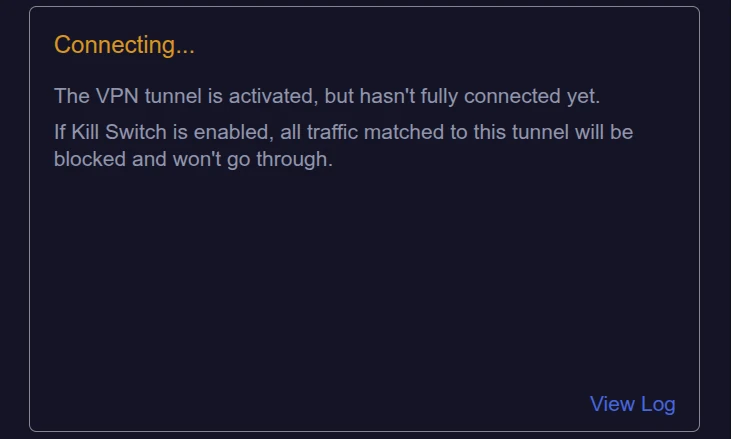
After clicking Apply, it’s normal for Tailscale to show a yellow/connecting state for 10–20 seconds while settings take effect. Wait for the status to return to green before testing your connection.
If Tailscale is disabled, the plugin’s toggle controls are hidden and a hint message appears: “Enable Tailscale above to configure these settings.”
The “Kill Switch” option will only show up when the “Custom Exit Node” option above is enabled.
The Version Manager remains visible since updating the TS binaries doesn’t require Tailscale to be running.
If you do not see the new features appear in the router’s Tailscale menu page, please “hard refresh” your browser tab to ensure you’re not seeing a cached page. If the issue persists, please try a router reboot to ensure the protocol handlers registered successfully.
Uninstallation
Through the GL AP: LuCI: System > Software > “Installed” Tab – find gl-tailscale-fix and click Remove. Clean removal either way – all injected UI, routing rules, kill switch routing, and config files are removed.
Or via ssh:
ssh root@192.168.8.1 opkg remove gl-tailscale-fixSetup Guide: Tailscale “VPN” with Kill Switch
This guide walks through the most common setup: a GL home router acting as a Tailscale exit node (using your home IP address), and a GL travel router you carry abroad that routes all traffic through it — with the kill switch ensuring your real IP doesn’t leak.
You’ll need two GL.iNet routers on the same Tailscale tailnet, with gl-tailscale-fix installed on both.
Note for “overlay network only” users: If you are not using TS as an exit node/VPN, you must enable “Allow Remote Access LAN” in the GL Tailscale panel at least once before our plugin’s features will fully activate routing from devices on the router’s LAN subnet. This is because GL’s firmware only creates the tailscale0 firewall zone and interface when LAN access is toggled on. Without it, there’s no firewall zone for masquerade, forwardings, or traffic routing. This is a GL firmware behavior, not a plugin limitation. For “exit node” users, this is enabled by default when selecting “Custom Exit Node”.
Step 1: Configure Your Exit Node Router (aka. VPN server)
This is the router that stays at your home — the one with the IP address you want to appear as. Open Admin Panel (AP) > APPLICATIONS > Tailscale.
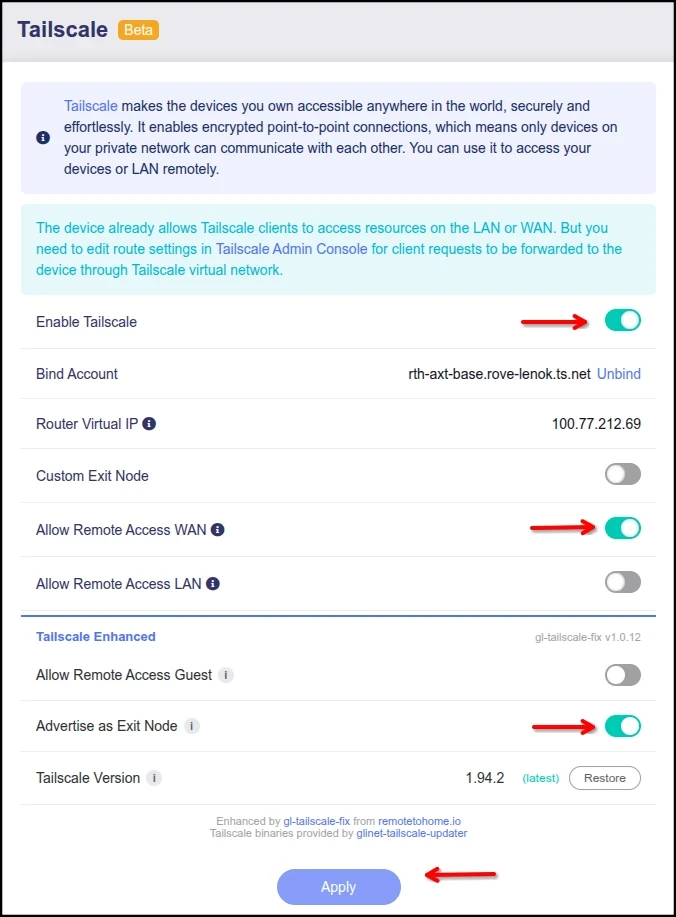
- Enable Tailscale and bind to your tailnet using the directions on the page (if you haven’t already)
- Enable Allow Remote Access WAN – this is required for exit node traffic to flow. Without it, clients can connect to your exit node but their traffic is silently rejected because the router’s firewall has no forwarding path from the Tailscale interface to the internet. (use Advertise WAN Subnets in 4.9+ fw.)
- Optional: Enable Allow Remote Access LAN – to share your home LAN subnet with your tailnet, so you can access home devices (printers, NAS, etc.) from anywhere if desired. (use Advertise LAN Subnets in 4.9+ fw.)
- Scroll down to the Tailscale Enhanced section
- Enable Advertise as Exit Node (or the GL Run Exit Node above in 4.9+ fw)
- Click Apply
- Optional: Enable IPv6 – AP > NETWORK > IPv6 (Mode = NAT6, DNS acquisition method = Automatic). This will only be useful if your ISP supports IPv6 (and it’s enabled on your primary gateway router).
After clicking Apply, it’s normal for Tailscale to briefly show a yellow/connecting state for 10–20 seconds while settings take effect.

If you neglect to select “Allow Remote Access WAN” you’ll see a reminder it’s required — this confirms the setting is active and your exit node is properly configured (pre-4.9 only).
Step 1.5: Approve Server Routes in the Tailscale Admin Console
Tailscale requires you to approve exit nodes and subnet routes in their admin console before they take effect. This is a one-time step per router — after the initial approval, future changes apply automatically.
Go to the Tailscale admin console and do the following for your Exit Node “server” router:
For your exit node router (home/office):
- Find it in the machine list
- Click the ⋯ menu > Edit route settings
- Enable the “Use as exit node” checkbox
- Approve the WAN subnet route and the LAN subnet route
- Save
- While you’re at it, Click the ⋯ menu again and “Disable key expiry” (optional, but recommended)
Step 2: Configure Your Travel Router
This is the router you travel with and need the attached devices to appear as if they’re at your home location. Open AP > APPLICATIONS > Tailscale.
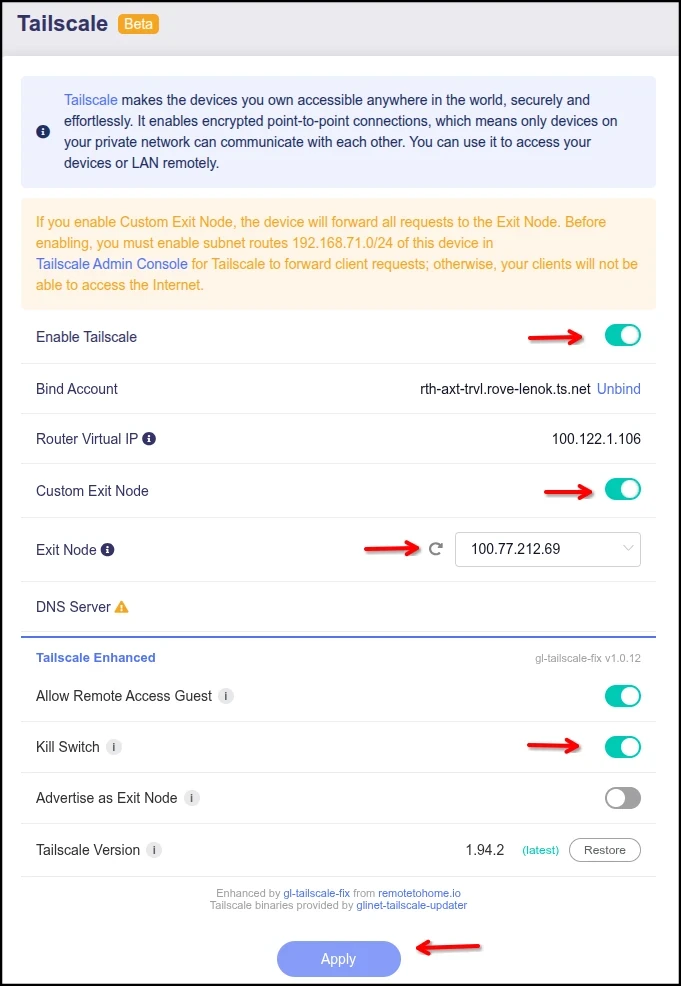
- Enable Tailscale and connect to the same tailnet
- Under Custom Exit Node, select your exit node router from the dropdown (click the refresh button if the list is empty – it takes a moment to populate)
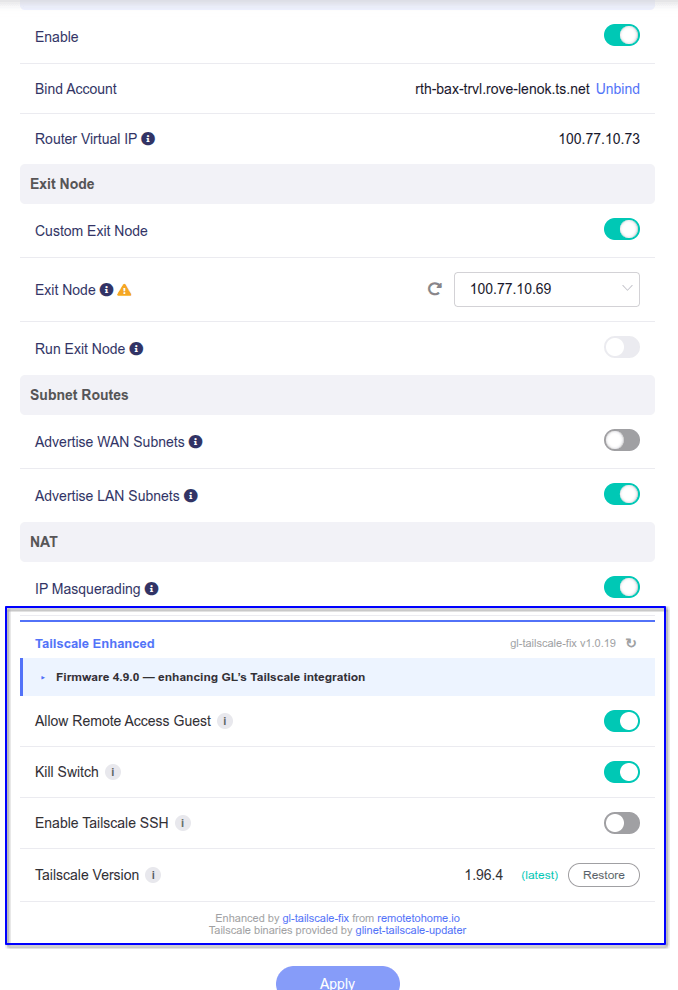
- If running 4.9.x firmware – enable “Advertise LAN Subnets” and “IP Masquerade”
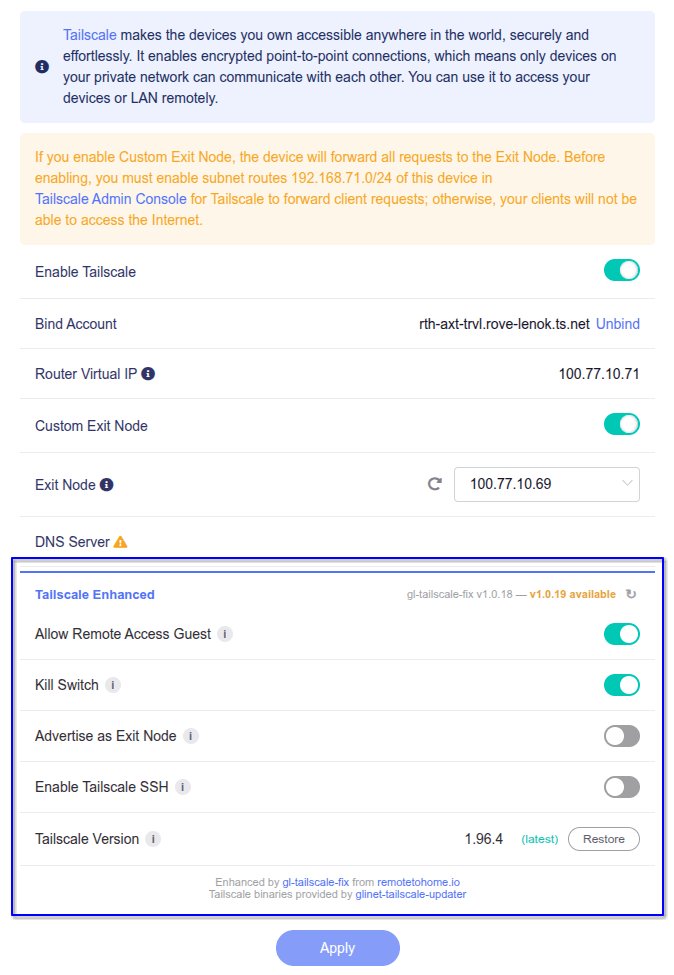
- Scroll down to the Tailscale Enhanced section
- Enable Allow Remote Access Guest if you want the guest network devices to also be routed (the primary LAN is routed by default)
- Enable Kill Switch – this is the critical setting that prevents your real IP from leaking if the exit node goes offline or if
tailscaledcrashes or restarts - Click Apply
- Optional: Enable IPv6 – AP > NETWORK > IPv6 (Mode = NAT6, DNS acquisition method = Automatic). This will only be useful if you’ve also enabled it on the server router and when traveling on IPv6 supported networks.
After clicking Apply, it’s normal for Tailscale to briefly show a yellow/connecting state for 10–20 seconds while the exit node connection establishes. Wait for the status to return to green before continuing.
NOTES:
- If you disable Custom Exit Node routing (or disable Tailscale), then gl-tailscale-fix will automatically disable the Kill Switch to allow normal traffic flow. The Kill Switch will need to be re-selected whenever you setup new Custom Exit Routing. (more)
- Allow Remote Access Guest functionality works both with Custom Exit Node routing or without. (more)
- Ensure you deactivate any WireGuard or OpenVPN client tunnels on the travel router prior to enabling the Custom Exit Node function to avoid routing conflicts. These features are not meant to run concurrently.
Step 2.5: Approve Client Routes in the Tailscale Admin Console
Again, Tailscale requires you to approve exit nodes and subnet routes in their admin console before they take effect.
Go to the Tailscale admin console and do the following for your travel “client” router:
For your travel router:
- Find it in the machine list
- Click the ⋯ menu > Edit route settings
- Approve the LAN subnet route and the Guest subnet route (if Allow Remote Access Guest was also enabled)
- Save
- While you’re at it, Click the ⋯ menu again and “Disable key expiry” (optional, but recommended)
Use unique subnet ranges on every router. If two routers on your tailnet share the same subnet (e.g., GL’s default 192.168.8.0/24), Tailscale can’t tell which router you’re trying to reach — routing becomes unpredictable. Change each router’s LAN and guest subnets to unique ranges before enabling subnet sharing. You can change subnets for each router in NETWORK > LAN and NETWORK > Guest Network in the GL admin panel.
Example subnets:
| Router | LAN Subnet | Guest Subnet |
|---|---|---|
| Exit Node Router (home server) | 192.168.8.0/24 | 192.168.9.0/24 |
| Travel Router (client) | 192.168.10.0/24 | 192.168.11.0/24 |
Step 3: Configure DNS on Your Travel Router
This step is critical and easy to miss. When your travel router uses a Custom Exit Node, the default DNS configuration will break.
GL’s Automatic DNS mode gets its DNS server addresses from the WAN connection — typically a private IP like 192.168.0.1 assigned by your hotel or local ISP. Once traffic routes through the Tailscale tunnel, those private DNS servers become unreachable from the other end. DNS resolution fails completely, and GL’s Tailscale page shows a “DNS Server ⚠” warning.
Fix: Go to NETWORK > DNS on your travel router and switch to one of these modes:
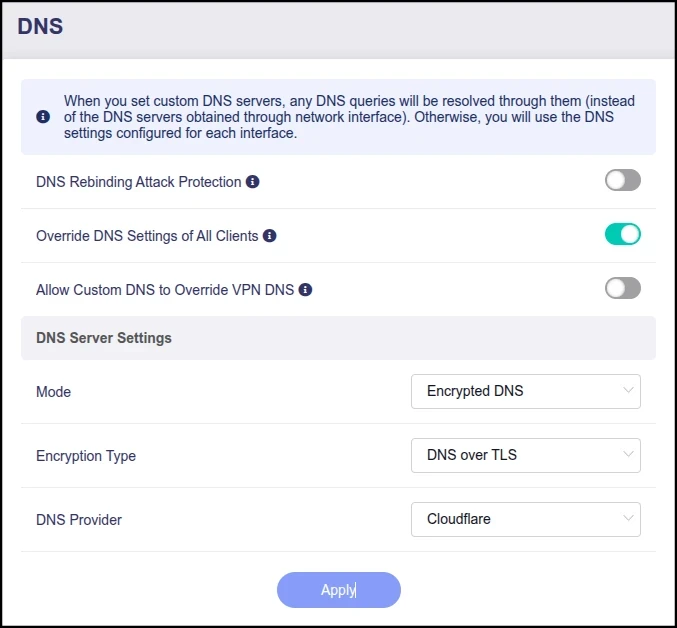
- Override DNS Settings of all Clients = On
- Then under the DNS Server Settings section:
- Mode: Encrypted DNS (recommended) – use Cloudflare DNS-over-TLS by default. Public, fast, and encrypted, or;
- Mode: Manual DNS – enter public DNS servers like
1.1.1.1and8.8.8.8. Reliable, but queries aren’t encrypted. - Optional: Mode: Manual DNS – enter the TS tailnet IP address of your home exit node router. This will forward client router packets to your exit node router for resolution (which you could have set to use your home ISP DNS servers for a full chain), but with a large caveat that your client router DNS will be broken if the tailnet is not actively connected (e.g. if Custom Exit Node router is disabled). Only recommended if really needed and you are willing to have to change DNS settings every time you enable/disable TS and every time you setup the travel router at a new location.
The exit node router’s DNS can stay on Mode: Automatic — it’s connected directly to the home ISP internet and its WAN DNS servers are always reachable.
Note about GL + Tailscale DNS settings: GL.iNet routers automatically pass the --accept-dns=false flag to Tailscale, which means the Tailscale admin console DNS settings (Global Nameservers, MagicDNS, etc.) have no effect on the router. DNS must be configured on the GL router itself.
Step 4: Verify Your Connection
From any device connected to your travel router’s LAN (or guest network if enabled):
- Open a browser and go to whatismyip.com – you should see your exit node router’s public IP, not your travel location’s IP
- Run a DNS leak test at browserleaks.com/dns – you should not see your local ISP’s DNS servers
- This is of course on top of the normal privacy considerations (WiFi/BT disabled, device time zone settings, 2FA lockdown, etc).
If you see your real travel location’s IP, double-check that the Custom Exit Node is selected and that DNS is configured per Step 3.
For the TL;DR crowd.. It’s done.

That’s it for a basic setup. The rest of the post is for deeper context. Not required for a functional setup, but still recommended to understand how your setup works.
Kill Switch Detail: Why It Matters + Testing
The kill switch is the most important feature in gl-tailscale-fix. If you’re using Tailscale exit nodes for anything where your real IP address matters, this section explains what you’re protected against – and how to verify both the existing leak issue and the new fix for yourself.
The Problem: Tailscale’s Built-In KS Isn’t Enough
Tailscale’s kill switch is a software feature inside the tailscaled daemon. When an exit node is configured, routing rules direct all traffic through the tunnel interface. If the exit node becomes unreachable, traffic has nowhere to go – it’s effectively blackholed. This handles normal disruptions: tunnel drops, server reboots, network blips.
But if tailscaled itself stops running, the kill switch disappears with it. Traffic falls back to routing out your local ISP connection silently – no warnings, no error message. On GL.iNet routers, there are several real scenarios where this happens:
tailscaledcrashes or gets OOM-killed – routing rules are cleaned up, traffic falls back to direct WANtailscaledfails to start after router reboot – no Tailscale routing exists, traffic goes direct to WAN- Tailscale settings changed in GL admin (e.g. changing Custom Exit Node IP targets) – triggers a service restart, routing rules are briefly absent
- Kernel panic or unclean shutdown –
tailscaledmay not restart cleanly
Our Solution: Routing-Level Defense
gl-tailscale-fix takes a fundamentally different approach. Instead of relying on Tailscale’s software kill switch, we add routing rules directly on the router at the kernel routing layer, completely independent of Tailscale. We arrived at this approach after many hours of build/test/rebuild originally using iptables/netfilter experiments. Those tests always ended with edge cases that could momentarily slip and also caused divergent implementation approaches between fw3/fw4 routers (OpenWRT 21.x/23.x).
Now, when the gl-tailscale-fix kill switch is enabled:
- Policy routing rules intercept all LAN and guest traffic before it can reach WAN
- The only path to the internet for your devices is through the Tailscale tunnel interface (tailscale0)
- If the tunnel is up, traffic flows normally. If the tunnel goes down for any reason, traffic hits an unreachable route and is blocked, not leaked.
- These rules operate at the kernel routing layer – before conntrack, before the firewall, before any other connection tracking. They don’t care whether tailscaled is running, crashed, or was never started. Even established connections that were flowing through the tunnel are immediately blocked when the exit node drops.
On a router, the TS built-in kill switch is like a discount electronic lock – it works until the power goes out. Our policy routing rules are closer to a deadbolt – full lockdown regardless of whatever fit tailscaled is having at the moment.
Failure Mode Comparison (4.5.x – early 4.9.x* firmware)
| Scenario | Tailscale built-in | gl-tailscale-fix |
|---|---|---|
| Exit node unreachable (tunnel drop, remote reboot) | Protected | Protected |
tailscaled crashes or is OOM-killed | Leak – daemon dies, traffic falls back to WAN | Protected – routing rules persist in kernel independently of daemon |
tailscaled fails to start after reboot | Leak – no Tailscale routing, traffic goes direct | Protected – routing rules are re-applied early in boot, before daemon starts |
| Tailscale settings changed in GL admin | Leak – service restart, rules briefly absent | Protected – routing rules independent of service lifecycle |
| GL firmware update resets Tailscale | Leak – may not be configured after update | Protected – routing rules survive sysupgrade |
| Kernel panic / unclean shutdown | Leak – tailscaled may not restart cleanly | Protected – routing rules re-applied on next boot |
| IPv6 leak when tailscaled dies | Leak – same as v4 | Protected – (v1.0.20+) – IPv6 rules at same priority as v4 |
* Update 5/24/2026: it seems GL has taken note and started adding kill-switch functionality to some of the more recent releases to close this gap. We’ve found it added on some pre-4.9 release and missing on other 4.9.0+ releases. There’s not yet been a public announcement about exactly which models & fw versions have received this enhancement, so your test results may vary. On these models it remains safe (compatible) to use the plug-in’s kill-switch for defense in depth, and to ensure both IPv4 & IPv6 security.
Proving It for Yourself: Live IP Leak Test
Instead of taking our word for it – here’s how to prove it for yourself.
For this specific example, we set up two GL-AXT1800 (SlateAX) routers on the same tailnet – one advertising as an exit node (server), the other connected to it as a Custom Exit Node client (from another country). From a laptop on the client router’s LAN, we ran continuous IP checks every 1 second, then killed tailscaled with SIGKILL to simulate an OOM kill — the most realistic crash scenario on a GL travel router.
How to Reproduce
All you need is your two Tailscale nodes – one configured as an exit node (GL router, RPi, PC, etc), and a GL router connected to it as a Custom Exit Node client (from the above setup guide) connecting from a different IP address. If you’ve already installed gl-tailscale-fix, then turn the kill switch off/on to see the different behaviors. Now from any laptop/PC connected on the travel router’s LAN, run one of the following commands to start IP monitoring every 1 second.
1a. Start continuous IP monitoring (from a Mac/Linux machine):
# Run from any device on the router's LAN
while true; do
  echo "$(date '+%H:%M:%S') $(curl -s --max-time 5 ifconfig.me/ip)"
  sleep 1
done1b. Start continuous IP monitoring (from a Windows 10+ machine using PowerShell):
# Run from any device on the router's LAN
while ($true) {
  Write-Host "$(Get-Date -Format 'HH:mm:ss') $(curl.exe -s --max-time 5 ifconfig.me/ip)"
  Start-Sleep 1
}Confirm you see the home/exit node’s IP on every line.
2. Kill the Tailscale daemon – Open a second terminal and SSH into your router: (Use your router’s LAN IP if you changed it from the default.)
ssh root@192.168.8.1Now simulate the crash (run repeatedly if needed):
# SIGKILL — simulates OOM kill (no graceful shutdown)
kill -9 $(pgrep tailscaled)
3. Watch the monitoring output for 10-15 seconds. OpenWrt’s init system (procd) will auto-restart the daemon.
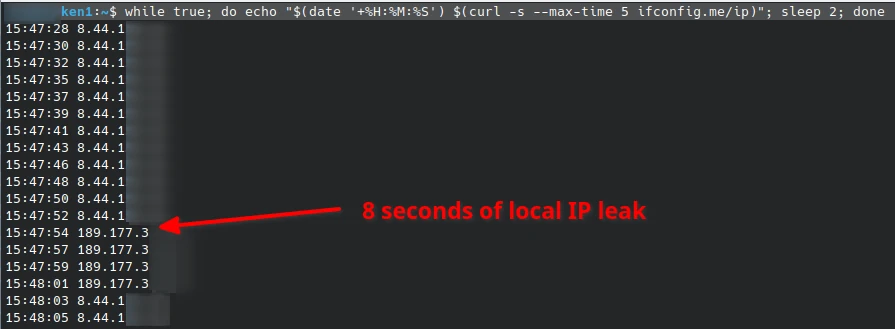
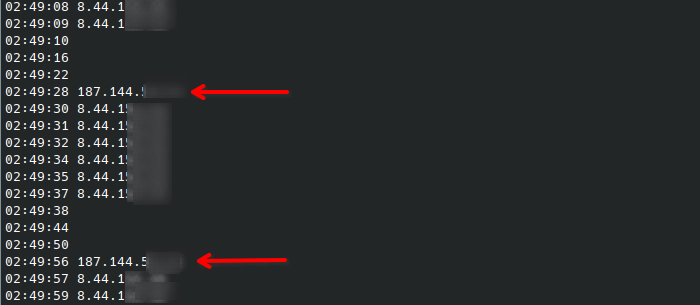
Expected Results Kill Switch Off (Stock GL behavior, or with KS turned off)
15:47:52  <exit-node-ip>     ← normal — traffic via exit node
15:47:54  <your-real-ip>     ← LEAKED — real IP exposed
15:47:57  <your-real-ip>     ← LEAKED
15:47:59  <your-real-ip>     ← LEAKED
15:48:01  <your-real-ip>     ← LEAKED
15:48:03 <exit-node-ip> ← procd restarted daemon, tunnel restoredFour requests over ~8 seconds exposed the real public IP. The router fell back to its direct local ISP connection the instant tailscaled died. OpenWrt’s procd restarted the daemon automatically, but by then the damage was done – any service or monitoring system that logged those requests now knows the real travel location IP. This would include your company if you were actively connected to their systems at the time (corp VPN client, Teams/Outlook, web portals, etc).
Expected Results With Kill Switch On (gl-tailscale-fix protected behavior)
15:52:52  <exit-node-ip>     ← normal — traffic via exit node
15:52:54                       ← BLOCKED — no response
15:52:56                       ← BLOCKED
15:52:58                       ← BLOCKED
15:53:00                       ← BLOCKED
15:53:02 <exit-node-ip> ← procd restarted daemon, tunnel restoredZero leak. The routing rules blocked all LAN>WAN traffic at the kernel level – before the packet even reached the firewall or connection tracker. The curl requests return empty – no leaked IP address – nothing. The connection goes dead. When procd restarted tailscaled and the tunnel reconnected, traffic resumed through the exit node as if nothing happened.
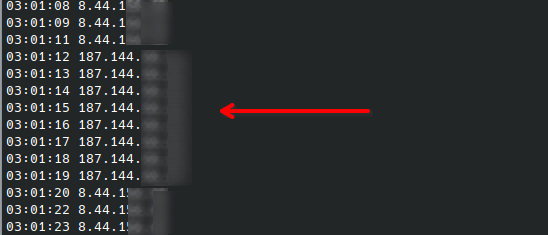
This ~8 second leak window from these tests is the best case – an idle load router with procd restarting almost immediately. Under real conditions with memory pressure, heavy traffic, or slow tunnel renegotiation, the window could be significantly longer, and repeated OOM kills could cause the IP to leak repeatedly. We found this repeat leak behavior on both a SlateAX & BerylAX when doing speed & iperf testing (again, another post to come).
What Still Works With the Kill Switch On
The kill switch is surgical. It only blocks traffic passing through the router (devices trying to reach the internet via WAN). Everything else continues normally:
- Router admin panel – you can still access GL’s admin interface from your LAN
- SSH access – you can still SSH into your router
- DNS resolution – devices can still resolve domain names (queries go to the router’s local resolver)
- LAN-to-LAN traffic – devices on your network can still talk to each other
- Tailscale management – the router’s own Tailscale control plane continues functioning so the tunnel can reconnect
Again, the kill switch toggle only appears when you have a Custom Exit Node configured, since it’s only relevant in that scenario.
Bonus Feature: Guest Network Access
Most GL.iNet travel routers have a built-in guest network that creates an isolated WiFi network with its own subnet. Out of the box, GL only creates firewall forwardings between LAN > Tailscale, and guest clients are excluded entirely. They can’t use exit nodes, can’t reach tailnet devices, and their subnet isn’t advertised to your tailnet.
The Allow Remote Access Guest toggle creates bidirectional forwardings between the guest network and the Tailscale interface, and advertises the guest subnet to your tailnet.
Use case: If you run a split-network setup – work devices on guest, personal devices on LAN – this lets your work devices route through Tailscale for compliance while keeping the networks isolated from each other. Other devices on your tailnet can also reach the guest subnet once it’s approved in the Tailscale admin console.
Bonus Feature: A Faster Path Out for CGNAT-Restricted Routers (v1.0.20+)
If your home internet ISP uses carrier-grade NAT (CGNAT) on IPv4 with native IPv6 alongside it – increasingly common on fixed wireless (e.g. TMo home internet), mobile-tethered connections, smaller ISP providers with limited IPv4s, and network with transition technologies like DS-Lite, MAP-E and MAP-T – v1.0.20 unlocks a tangible performance improvement.
The situation before v1.0.20:
Many customers have defensively kept disabled IPv6 on their GL router because the GL Tailscale integration didn’t include any IPv6 leak protection, and the plugin didn’t either. With IPv6 off, the Tailscale daemon on the router had no public IPv6 endpoint to advertise to peers – every connection to the router had to go over IPv4. On an ISP with CGNAT, that IPv4 path is typically degraded, often falling all the way back to Tailscale’s DERP relay because direct UDP holepunching fails through carrier NAT.
What v1.0.20 changes:
The Kill Switch and the tailscale0 masquerade fixes now cover IPv6 with the same kernel-level protection they always did for IPv4. That means you can safely re-enable IPv6 on your GL routers for a Tailscale setup without worrying about v6 leaks if the tunnel drops.
Once IPv6 is enabled on the router:
- The Tailscale daemon advertises a public IPv6 endpoint to peers
- Tailnet peers can now establish direct connections to the router over IPv6, completely bypassing the CGNAT’d IPv4 path
- Once connected, IPv6 traffic actually traverses the tunnel and exits cleanly to the internet (previously broken – silently dropped at the router’s egress on iptables-based firmware)
- IPv6-capable destinations (Google, Cloudflare, Meta, most major CDNs) stay on the fast native path end-to-end instead of falling back to the slow CGNAT’d v4 path
To get this benefit: GL ships with IPv6 disabled by default. Enable IPv6 on both the exit-node router and the travel router under NETWORK > IPv6 > Mode = NAT6, DNS acquisition method = Automatic (recommended for privacy). The plugin protects it from there.
This won’t help if your ISP doesn’t provide native IPv6 alongside its CGNAT’d IPv4 as there’s no v6 path to use. But for the network types listed above, the gain in real-world connection quality is significant.
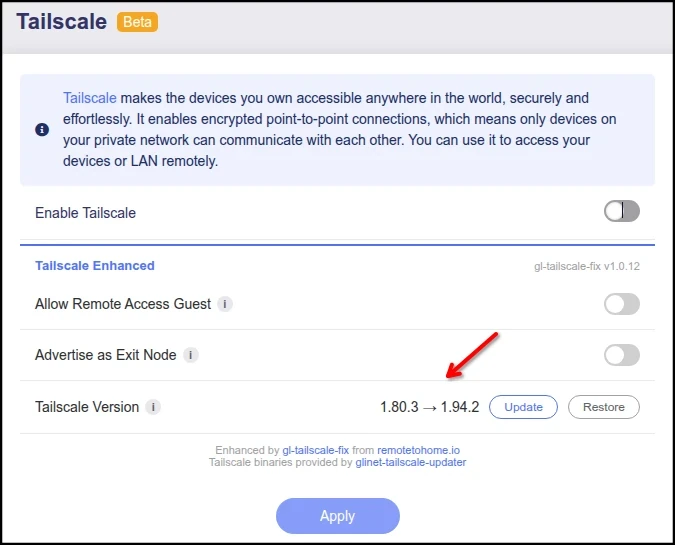
Bonus Feature: Tailscale Version Manager
By default, GL routers ship with an outdated Tailscale binary and provide no way to update it through the admin panel. The Version Manager shows your installed version alongside the latest stable release, with one-click update and factory restore.
Updates use space-optimized combined binaries from @Admonstrator’s glinet-tailscale-updater – a single ~5.3MB file that actually frees flash space compared to the factory binary (~23MB). This updated binary persists across reboots and firmware upgrades.
🛑 Warning: Do not use the Tailscale website admin console “Update” button. It installs the standard Tailscale binaries totaling ~52MB (2x larger than GL’s default). Use the Update button in the gl-tailscale-fix section instead. If you accidentally updated via the TS website dashboard, use the Restore button to revert to factory, then update again through gl-tailscale-fix for the ~5MB optimized binary.
How gl-tailscale-fix Works
For the curious – gl-tailscale-fix is a single .ipk package, under 50KB. No compiled binaries – it’s pure Lua, shell, and vanilla JavaScript.
- Backend: A custom Lua RPC module loaded by GL’s OpenResty API dispatcher.
- Frontend: Vanilla JS injected into GL’s single-page admin panel via nginx body filter.
- Persistence: Three independent mechanisms ensure settings survive from GL’s
tailscale up --reset - Kill switch: Policy routing operates at the kernel routing layer before conntrack and firewall.
Full source code and technical architecture: github.com/RemoteToHome-io/gl-tailscale-fix
gl-tailscale-fix Router Compatibility
Tested on GL firmware versions 4.5.x – 4.9.0. From 4.5.x – 4.8.x the functionality is identical. On 4.9.x, the plugin auto-detects the firmware and adapts: the “Advertise as Exit Node” toggle is hidden because GL provides it natively as “Run Exit Node”, and GL added an “IP Masquerading” toggle that exposes the masquerade on/off state to user control. On pre-4.9 firmware the plugin continues to auto-enable masquerade as defense-in-depth. On 4.9+ the plugin defers to the GL IP Masquerading toggle setting. On 4.9+ the plugin’s primary value remains its kernel-level Kill Switch – still the only consistent daemon-independent leak protection, plus Guest subnet routing, Tailscale SSH toggle, and the Version Manager.
See the full compatibility matrix on GitHub.
Disclaimer
gl-tailscale-fix is an open source plugin provided by RTH freely for the benefit of RTH & GL customers to help enhance security and functionality. This software is not formally endorsed by GL.iNet, and no warranty applies. Please read our full disclaimer on GitHub. Honestly, I’m hoping GL will adopt the functionality and integrate it into the OEM firmware, rendering this plugin obsolete, but until then…
Note to my GL friends – I am willing to assign a perpetual non-GPL’d license to GL for proper OEM firmware integration. Otherwise, this remains GPL-3.0 licensed to ensure it cannot be adopted by other vendors for closed-source firmware purposes.
Changelog
Accessory (2026-05-25): Physical side switch toggle control
- Added an optional accessory script (must be installed separately) to allow TS Custom Exit Node routing + Killswitch to be quick activated via the physical Mode toggle switch on relevant models (Beryl, Slate, etc).
v1.0.20 (2026-05-24): IPv6 enablement + reliability fixes
- Kill Switch now covers IPv6 – same kernel-level policy routing rules at priority 5280 now install for both IPv4 and IPv6. Verified zero leak on tailscaled death across both families.
- Subnet Routing Fix covers IPv6 – the plugin now sets both masq and masq6 on the tailscale0 firewall zone, fixing the same cross-subnet routing failure mode for IPv6 that v1.0.13 fixed for IPv4.
- Exit-node-server IPv6 SNAT backstop (pre-4.9 routers) – when advertising as Tailscale exit node on pre-4.9 firmware, the plugin now ensures
wan.masq6=1as a defense-in-depth safety net. Tailscale’s own IPv6 SNAT chain is empty on iptables-based firmware (likely a Tailscale-side iptables-backend gap), so IPv6 egress for tailnet clients using this router as an exit node depends entirely on GL’swan.masq6setting. GL generally sets this on its own; the plugin guarantees it in case GL’s defaults vary by model or firmware variant. On firmware 4.9+ the plugin defers to the IP Masq manual toggle setting. - Safer for CGNAT-restricted customers – customers who previously defensively disabled IPv6 on their GL router to avoid leak risk can now re-enable it. See the new “A Faster Path Out for CGNAT-Restricted Routers” section above for the practical impact on networks behind carrier-grade NAT with native IPv6.
- Watchdog reliability – the Tailscale-disabled detection in the watchdog is now idempotent. The prior implementation could miss a fast disable > re-enable cycle inside its 5-second poll window, leaving Kill Switch rules in place when they shouldn’t be. Now the check fires on every poll where Tailscale is off and KS rules are still present, until the teardown completes. (The v1.0.19 note about disabling KS before disabling Tailscale is no longer needed.)
- 4.9 Custom Exit Node reconcile — on firmware 4.9, when GL’s admin panel sets a Custom Exit Node IP but the Tailscale daemon hasn’t actually been told to use it, the plugin now applies the setting itself on the next reapply. Gated by a value-snapshot so unrelated UCI changes don’t trigger a spurious reconcile.
- Masquerade deferral on 4.9+ – on firmware 4.9 and newer, the plugin no longer auto-enables masquerade on the tailscale0 zone – GL owns that toggle natively and the plugin defers to it. On pre-4.9 the auto-enable behavior is unchanged.
- Cache-busting on the admin-panel JS – the plugin’s injected script tag is now version-stamped so browsers refetch it after a plugin upgrade instead of showing the previous version’s badge until a hard refresh.
- Known limitation on firmware 4.9+: if you have both GL’s “IP Masquerading” toggle and “Allow Remote Access LAN” turned off on the Tailscale page, GL may leave the tailscale0 zone without IPv6 masquerade – in which case LAN-side IPv6 won’t traverse the exit-node tunnel. Enable either setting and IPv6 works. The Kill Switch still protects on 4.9 regardless of masquerade state.
v1.0.19 (2026-04-24): GL firmware 4.9 compatibility
- 4.9 compatibility – plugin now auto-adapts to coexist with GL’s native 4.9 Tailscale features. The Kill Switch, Guest routing, Tailscale SSH toggle, and Version Manager remain active; the “Advertise as Exit Node” toggle is hidden because GL 4.9 provides it natively via “Run Exit Node”. v1.0.18’s auto-disable behavior on 4.9 is removed. The kill switch is still the only daemon-independent protection available on 4.9+, so the plugin should stay active.
- Kill Switch function remains – GL did not ship KS rules in the 4.9.0 firmware. The plugin’s policy routing (
ip rule+ip route) killswitch method is still required.NOTE: When disabling Tailscale via the GL main switch, disable the Kill Switch toggle in the “Tailscale Enhanced” section first, then disable Tailscale. Failing to do so may leave the Kill Switch active and block your internet for several seconds (or longer if you re-enable Tailscale within ~5 seconds, which prevents the auto-teardown from firing).<< No longer necessary with v1.0.20! - IP Masquerading – plugin still auto-enables masquerade as defense-in-depth on all firmware. On 4.9, GL added a native ‘IP Masquerading’ toggle that exposes the masquerade state to your control; the plugin and GL agree in nearly all real configurations
- Migration hint for upgrades from v1.0.18 on 4.9 – on install, v1.0.19 detects prior-version state and shows a “re-enable Kill Switch” prompt above the Kill Switch row.
- Tailscale binary version refresh – the Version Manager’s installed-version display now refreshes automatically after an update completes, without needing an nginx restart.
- Internal robustness fixes – UCI commit error checking across RPC methods, dismiss-RPC confirmation before local state change, localStorage try/catch, postinst error-path logging.
v1.0.18 (2026-03-28): Plugin firmware upgrade persistence
- GL firmware upgrade persistence – Plugin files and updated TS Tiny binary now survive firmware upgrades on GL firmware 4.x automatically. Previously only the UCI config was preserved and you’d need to reinstall the plugin after upgrade.
- Firmware 4.9+ plugin function block –
The plugin detects GL firmware v4.9.0 and above, disables itself cleanly, and shows a warning banner with final removal instructions. GL’s 4.9 firmware includes some native TS feature changes that need evaluation.(removed with plugin v1.0.19) - Code review fixes – XSS hardening and background polling improvements.
v1.0.17 (2026-03-22): Masquerade by default
- Masquerade always-on —
ensure_masquerade()now runs on every install, reapply, and admin page visit, even with no plugin features enabled. Previously masquerade was only applied when a plugin feature was active. This fixes an issue where LAN clients couldn’t reach Tailscale peers through subnet routing because the return traffic had no SNAT path. If you’ve had trouble reaching other devices on your tailnet from a LAN client (timeouts, no response), this is likely the fix.
v1.0.16 (2026-03-21): Tailscale SSH added
- Tailscale SSH — New toggle to enable passwordless SSH from Tailscale peers (
tailscale set --ssh). Requires an SSH ACL rule in the Tailscale admin console. - Upgrade output fix (#5) — Plugin upgrades via
opkgno longer show noisy firewall reload output that appeared to hang the terminal. (cosmetic only) - Code quality — Added safety guards on background process management, fixed a file locking race condition, reduced unnecessary CLI calls when Tailscale is disabled.
v1.0.15: OOM prevention, kill switch reliability, version cache refresh
- OOM prevention for 512MB routers: Reduced memory footprint of background polling by ~80%. The plugin now uses lightweight kernel routing queries and caches for status checks where possible.
- Kill switch reliability: Fixed a race condition where enabling Kill Switch + Custom Exit Node simultaneously could cause the kill switch to disable itself during Tailscale’s restart cycle, requiring a second click/apply to enable.
- Plugin version cache refresh: Tailscale and plugin version checks now cache for 72 hours with a manual ↻ refresh button.
- Installer hardening: Fixed exit code propagation in the download and checksum verification pipeline.
- Batched firewall reloads: Reduced from up to 3 separate firewall reload cycles to a single atomic reload, shortening the disruption window during settings changes.
- LuCI install compatibility: The
gl_tailscalestock restore (previously only in the SSH installer) now runs for all installation methods including LuCI web upload.
v1.0.14: Installer Improvements
Thanks to a PR from Admon, this version now includes an automated installer script (and a github CI build process). Now, if installer script detects a user-modified gl_tailscale wrapper (e.g. a manual --advertise-exit-node modification), it restores the original file from the GL factory ROM to prevent conflicts with the plugin’s exit node function. All integration remains through standard OpenWrt interfaces (UCI, hotplug, procd & nginx includes), so no GL scripts or binaries are altered from their factory state. Plugin continues to provide clean install and full removal.
v1.0.13: Subnet Routing Fix (now default enabled as of v1.0.17)
Credit to u/mightyarrow on Reddit for the detailed bug report (more correlation here). Tailscale subnet routing on GL routers intermittently fails on fw3-based firmware, requiring manual firewall zone edits in LuCI to work reliably – specifically, enabling masquerade on the tailscale0 zone.
The problem: When two GL routers share LAN subnets via Tailscale (“Allow Remote Access LAN”), devices on one router’s LAN can normally reach devices on the other router’s LAN through the Tailscale tunnel. But after disabling and re-enabling Tailscale – or after a daemon crash and restart – this cross-subnet traffic can silently break. The router itself can still ping and SSH across the tunnel, but LAN client devices cannot. Tailscale shows “Running” and subnet routes are approved. There’s no error message, but traffic just stops flowing.
Why it happens: Tailscale has built-in source NAT that rewrites the source IP of incoming subnet traffic before forwarding it to LAN devices. This ensures return traffic routes back through the router. On routers running fw3 (iptables-based firmware – Beryl AX, Flint, Flint 2, Brume 2, Beryl 7), this SNAT can fail to reinitialize after a daemon restart. Router-originated traffic still works because it takes a different path through the network stack. Only forwarded traffic from LAN client devices is affected.
The fix: gl-tailscale-fix now automatically enables masquerade on the tailscale0 firewall zone. This is a standard OpenWrt firewall mechanism that provides the same source NAT at the firewall layer – independent of Tailscale’s internal state. It’s applied automatically when Tailscale is active, re-applied after every restart, and removed cleanly when the plugin is uninstalled. No user action required.
If you’ve been manually adding IP masquerade via LuCI, the plugin now handles this for you. Just grab the latest version from the download notification link in the plugin UI. No TS restart needed.
GL routers using both fw3 (iptables) and fw4 (nftables) are supported — the kill switch uses kernel routing (not firewall-specific), guest forwardings use GL’s UCI abstraction layer.
gl-tailscale-fix is open source under GPL-3.0 and available on GitHub. If you find it useful, please give it a star. If you find a bug, please open an issue.
Update: for active discussion, you can also find the announcement on reddit.
Safe travels!
Still have questions? Want a custom tailored privacy solution used by hundreds of expats across the world daily? Contact us


5 thoughts on “Enhanced Tailscale for GL.iNet Routers”
[…] post is a supplement to our previous Enhanced Tailscale for GL.iNet Routers, specifically focusing on Tailscale SSH functionality via a GL […]
FYI Please note if using Windows 10 with powershell v5 the curl command is actually an alias, will end up using Invoke-WebRequest and just give you errors when trying what was listed above to check IP address. Either update to powershell 7 to use what was listed above or use the below instead that specifically points to curl.exe
while ($true) {
Write-Host “$(Get-Date -Format ‘HH:mm:ss’) $(C:\Windows\System32\curl.exe -s –max-time 5 ifconfig.me/ip)”
Start-Sleep 2
}
To check your powershell version you can run $PSVersionTable.PSVersion
Example output for $PSVersionTable.PSVersion:
Major Minor Build Revision
—– —– —– ——–
5 1 19041 7058
For reference here’s an example error I was getting when running what was listed above:
Invoke-WebRequest : A positional parameter cannot be found that accepts argument ‘ifconfig.me/ip’.
At line:2 char:48
+ … (Get-Date -Format ‘HH:mm:ss’) $(curl -s –max-time 5 ifconfig.me/ip)”
+ ~~~~~~~~~~~~~~~~~~~~~~~~~~~~~~~~~~~
+ CategoryInfo : InvalidArgument: (:) [Invoke-WebRequest], ParameterBindingException
+ FullyQualifiedErrorId : PositionalParameterNotFound,Microsoft.PowerShell.Commands.InvokeWebRequestCommand
Hi AD. Thank you for the feedback! I’ve updated the example to explicitly call curl.exe which should bypass the alias and work on both PS5 and PS7, even without the full directory path. Further testing feedback welcomed (I only have linux machines locally).
Thank you for making this available to the community.
I have installed this and I’ve tested the previous very short leaks which this kill switch is now preventing.
I have configured my side switch on the Beryl to switch Tailscale on and off using the below script. WOuld you have any idea how I could amend this script so that it also toggled on the kill switch whenever I used the switch to turn on tailscale?
nano /etc/gl-switch.d/Tailscale.sh
#!/bin/sh
action=$1
if [ “$action” = “off” ]; then # Switched the logic so “off” now enables Tailscale
enabled=true
lan_enabled=false
wan_enabled=false
exit_node_ip=”XX.XX.XX.XX”
elif [ “$action” = “on” ]; then # “On” now fully disables Tailscale
enabled=false
lan_enabled=false
wan_enabled=false
exit_node_ip=””
else
echo “Usage: $0 [on|off]”
exit 1
fi
curl -H ‘glinet: 1’ -s -k http://127.0.0.1/rpc -d “{\”jsonrpc\”:\”2.0\”,\”method\”:\”call\”,\”params\”:[\”\”,\”tailscale\”,\”set_config\”,{\”enabled\”:$enabled,\”lan_enabled\”:$lan_enabled,\”wan_enabled\”:$wan_enabled,\”exit_node_ip\”:\”$exit_node_ip\”}],\”id\”:1}”
sleep 5
Thanks again.
Hi Matt. Thanks for the inspiration. Decided to add a slightly dressed up version to the repo so it won’t get mangled with comment formatting:
https://github.com/RemoteToHome-io/gl-tailscale-fix#accessories
A few small differences from your version: it now supports when there are multiple exit nodes, restores the plugin prefs on each toggle and preserves on/off selections.
You can install via the wget on-liner in the linked readme, then edit the Configuration block to match your setup. Default config is just LAN routing & KS enabled. Guest routing option is also selectable.
Did basic testing on an AXT1800, but should be portable across the “switch” modes. Let me know if you run into any issues.